
Author: John Shinners
Sunburst with a dark past!
Sometimes there’s a story that goes along with a project you’ve completed. That theory holds true for my latest creation. Making something interesting out of a material that is anything but interesting can be a challenge. The material this story is about was found while preparing my parents house for sale after my Mom passed away. We were busy taking items from the house to stage them in the garage for an estate sale. I was stacking boxes on some shelves towards the back of the garage. These shelves had been there as far back as I could remember. I never noticed the bottom shelf was made from am old barn door and it was huge. I saw it and said to myself “hey, barn doors are in vogue now, maybe I could sell this for a few bucks”. After the sale was over, I came back to tear out that shelf along with the one above it and take them both back to the shop for examination. It was then I discovered the second shelf was made from a very different material. This second shelf is the real topic this story is about. I had looked at the bottom of this shelf hundreds of times and never noticed anything unusual. That is until I removed it and discovered what it was made from. My parents house was originally sided with cedar clap board. It had been removed when the house was updated to aluminum siding back in the 1950’s. This was mainly due to the overburdening labor it took to keep the wood siding painted. My dad had exhausted his labor supply and by that I mean his kids. What could be described as Dad’s greatest financial decision, he decided to remove the wood siding and buy the aluminum replacement. The old homestead had 2-1/2″ cedar clap board that came with three courses to a board. I now had five boards from the shelf 8 inches wide each and 8 feet long. The question still remained what could I do if anything with these boards that would remind me and my family of their origin.
It needs to be pointed out here that these weren’t just any ordinary shelves. Their location was central to some of our most important activities. They were filled with Christmas decoration and Halloween costume boxes, our family camping tents (our family was so big there had to be two full size tents), or sometimes hot rod car parts. They were a constant source of fascination to me as an adolescent boy. Sometimes things were hidden by siblings in a failed attempt to keep others from finding them. I can remember a few treasures like the wooden model boat with a wind up motor for power. I think it was understood that this particular item was off limits but living on a lake, the temptation was just to great. I remember watching from the shore with excitement as the boat was racing around the shoreline, and the cold feeling that hit me when I realized it wasn’t coming back as it motored towards the opposite side of the lake! You could play with anything from the shelves as long as you didn’t get caught. It took me hours to find that boat. My brother still has it!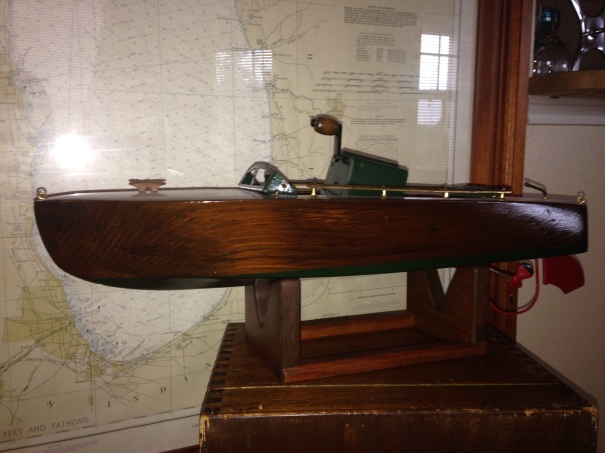
All that being said, it leads me to the million dollar question. What should I do with this newly discovered house siding material? Three years have gone past and I’ve still got nothing. I did find a use for the barn door though. Here’s a picture of that door mounted in a fictitious manner to the side of my workshop.

My faux barn door

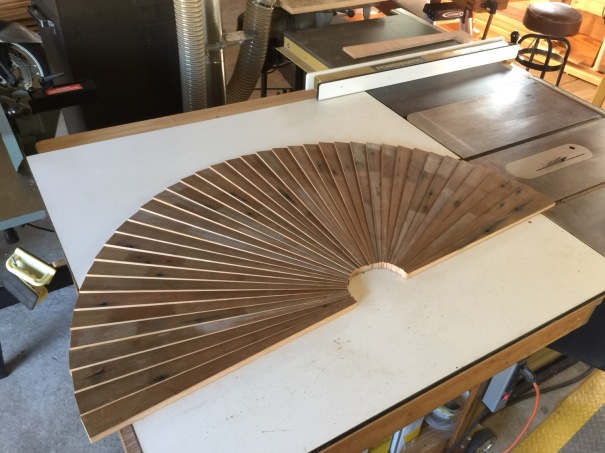 The radius in the center was a perfect fit for a one gallon paint can. I used the can as a template to make the center piece. Finally, I got rewarded with a glimpse of progress. Now I had something to work with, but the momentum stalled quickly. I realized I had no idea where I was going to put this beauty. It was absolutely huge! Our house was small and most of the wall “real estate” was spoken for. There was one more minor detail, I wasn’t sure how it was going to be finished. Should I paint or stain it? What colors should I use? Oh no!, not me selecting colors again! Being hopelessly color blind I began to sweat. I don’t even pick out my own clothes unless it’s Halloween. I decided I should float it out there on Facebook for some input. Epic fail! Note to self; never do that again. Once again the entire package was bundled and put off to the side for further review.
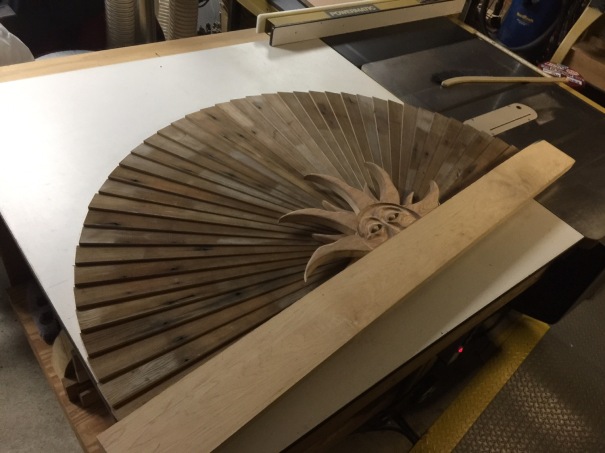
I had plenty of time to mull my next step over since then. I had been waiting quite some time to try out my new carving chisel set and now looked like the perfect opportunity. All I had to do was pick a face I could carve for the sun and choose some kind of material to use. I had heard mahogany carved well so I got some and began my carving activities. After several days this is what I came up with.


 Lots of work left to do!
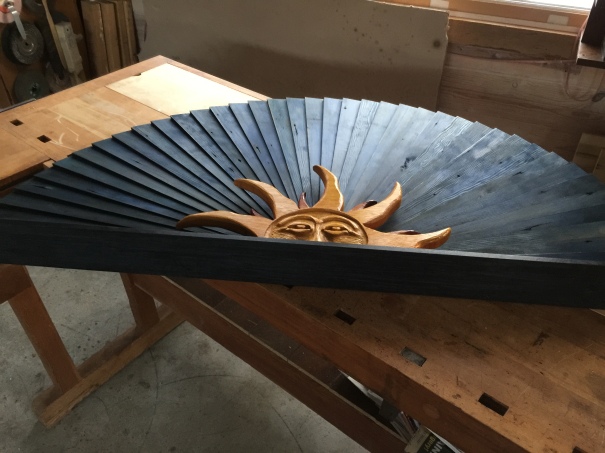
I enlisted the help needed to choose finish colors from no one else but my wife Karen. This was a risky choice since we rarely agree on anything. What I mean is when it comes to selecting paint colors. She does have a good eye when it comes to decorating whereas I don’t so it was a good place to start. That’s not to say it wasn’t a challenging process for us. I was thinking Chalk paint for my first choice and she wanted it stained . The final selection for a finish was wood dye. I had to learn how to use it first though. Wood dye is different from wood stain. My goal was to apply the dye, allow it to penetrate in and leave the woods natural grain to remain visible. The challenges were two fold. First, the cedar material had over fifty years of dirt and oil on the surface. In order to allow the stain to penetrate I had to do something to the surface. I decided to hand plane each piece. Here’s what that looked like.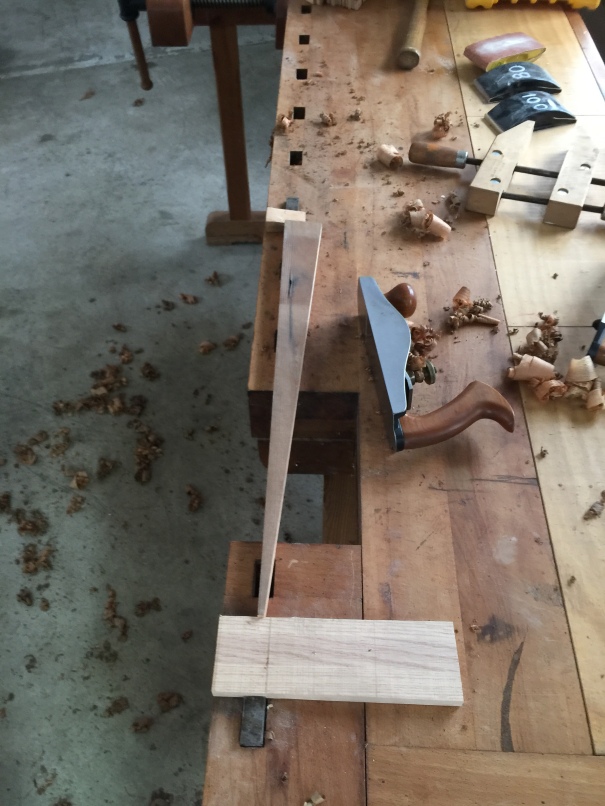 Once they were planed, I painted the edges black to create a strong shadow line between pieces.
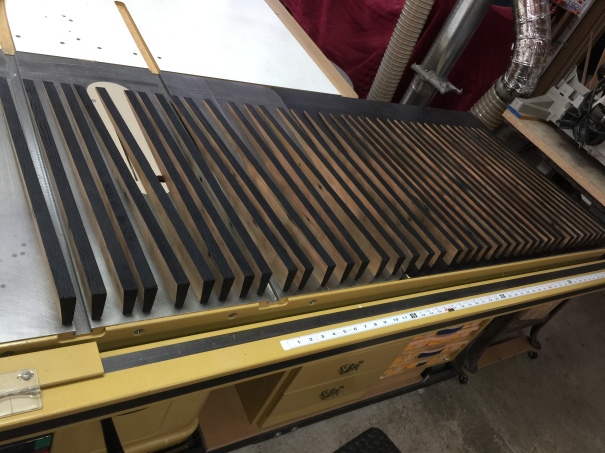 The second challenge was going to be mixing the colors to achieve an array look. I decided to put this task off. I did know what color the sun carvings were going to be so I began staining them.
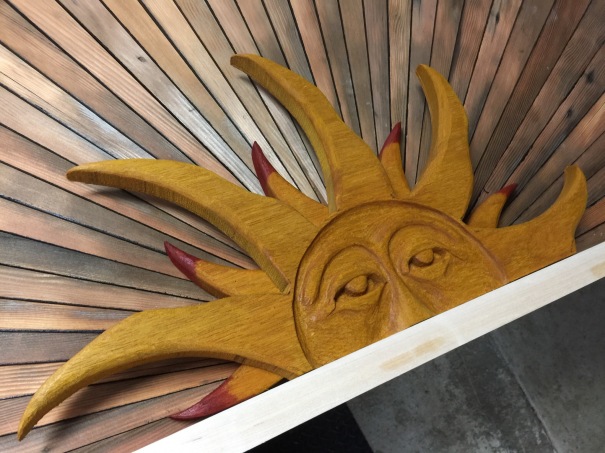 It was time. There was nothing else left to do but get the dyes ready for the sky colors. I dove into mixing the dyes. My goal was to come up with three different shades of blue. It took some doing but I was finally ready to start staining my rays.
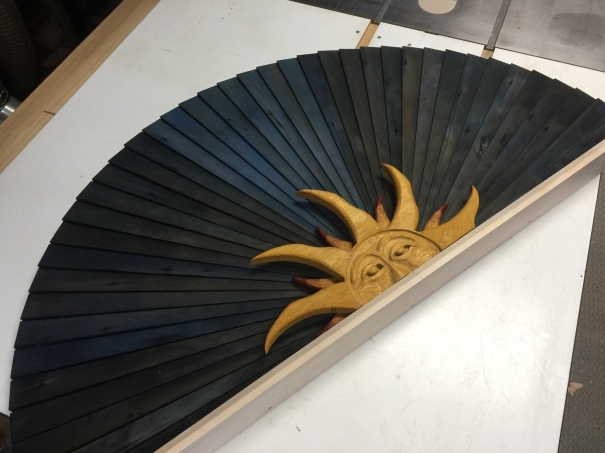 The colors were good but I thought they would look better with another coating.
 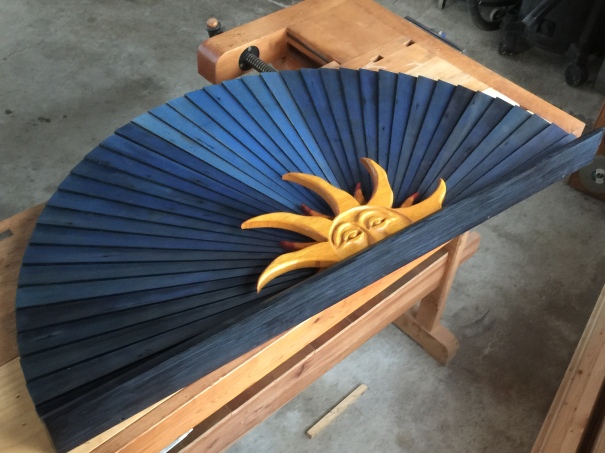 I did have to tone things down a bit. The lightest blue in the center needed a little sanding. I massaged things a bit more and was pretty happy with the final product. Light has a big impact on how it will look and the picture below is a pretty good example of the interior of our home.
It was now time to permanently glue all the rays in place. Until now I was just placing the parts loosely together to get a good visual. The photo below shows what the glue up looked like. I used a deck of cards to make sure all the parts were evenly spaced. And it looked pretty cool to.
 I still need to find a place for this behemoth. Turns out Karen wasn’t all that committed to the spot I had picked for its home. And since it’s so big, there really was only one spot it could fit and now that one might be off limits.
Maybe I’ll just put it out there on Facebook again! Thanks for reading my story about a shelf. Sometimes people even leave comments!
Gotta love a six!
Sometimes you twist the throttle to go faster and other times you just want to take in the aural sensation that a six cylinder bike offers. It’s intoxicating.
On our way north I dropped in to hang out and go for a spin with Kevin on one of his bikes. Knowing what bikes are in his shed I knew what I wanted to ride…
Kevin restores bikes, strips them down to the frame, powder coats the frame, rebuilds, sources and replaces parts, and breaths new life into these old bikes. The end products are simply drop dead gorgeous. I’m sure they didn’t look this good coming out of the factory.
I walked outside to the sight to Kevin’s daily ride, his beautiful 1990’s Kawasaki zephyr 1100 with after market 4 into 4 pipes and custom striping as a hark back to the 70’s bikes. While still a few generations old…
View original post 644 more words
Sunburst with a dark past!
Sometimes there’s a story that goes along with a project you’ve completed. That theory holds true for my latest creation. Making something interesting out of a material that is anything but interesting can be a challenge. The material this story is about was found while preparing my parents house for sale after my Mom passed away. We were busy taking items from the house to stage them in the garage for an estate sale. I was stacking boxes on some shelves towards the back of the garage. These shelves had been there as far back as I could remember. I never noticed the bottom shelf was made from am old barn door and it was huge. I saw it and said to myself “hey, barn doors are in vogue now, maybe I could sell this for a few bucks”. After the sale was over, I came back to tear out that shelf along with the one above it and take them both back to the shop for examination. It was then I discovered the second shelf was made from a very different material. This second shelf is the real topic this story is about. I had looked at the bottom of this shelf hundreds of times and never noticed anything unusual. That is until I removed it and discovered what it was made from. My parents house was originally sided with cedar clap board. It had been removed when the house was updated to aluminum siding back in the 1950’s. This was mainly due to the overburdening labor it took to keep the wood siding painted. My dad had exhausted his labor supply and by that I mean his kids. What could be described as Dad’s greatest financial decision, he decided to remove the wood siding and buy the aluminum replacement. The old homestead had 2-1/2″ cedar clap board that came with three courses to a board. I now had five boards from the shelf 8 inches wide each and 8 feet long. The question still remained what could I do if anything with these boards that would remind me and my family of their origin.
It needs to be pointed out here that these weren’t just any ordinary shelves. Their location was central to some of our most important activities. They were filled with Christmas decoration and Halloween costume boxes, our family camping tents (our family was so big there had to be two full size tents), or sometimes hot rod car parts. They were a constant source of fascination to me as an adolescent boy. Sometimes things were hidden by siblings in a failed attempt to keep others from finding them. I can remember a few treasures like the wooden model boat with a wind up motor for power. I think it was understood that this particular item was off limits but living on a lake, the temptation was just to great. I remember watching from the shore with excitement as the boat was racing around the shoreline, and the cold feeling that hit me when I realized it wasn’t coming back as it motored towards the opposite side of the lake! You could play with anything from the shelves as long as you didn’t get caught. It took me hours to find that boat. My brother still has it!
All that being said, it leads me to the million dollar question. What should I do with this newly discovered house siding material? Three years have gone past and I’ve still got nothing. I did find a use for the barn door though. Here’s a picture of that door mounted in a fictitious manner to the side of my workshop.
My faux barn door
I had some fun with that, but have recently removed the door in order to sell it. To my surprise no has made me an offer yet. I’m still left with the clap board siding. I decided after staring over and over at it the best approach would be to do something, anything in order to get started. I got out my power washer and started cleaning the boards. I’ve done this before and it helps with the creative process. Plus, what guy doesn’t get excited about spending some quality time playing with a power washer? This time though, it did not help. I put the clean boards back in the shop on my assembly bench, looked them over thoroughly, then proceeded to throw them off to the side in disgust again. This seems to be an unavoidable step in the creative process because I can’t seem to move forward without doing it. Another crucial step in my creative process involves me tripping over piles of stuff. After one final tripping episode, the time had come. Either I decide on a project or me and the boards were going on a short walk to the burn pile. My desire was to make some kind of a sunburst out of this pile, but I just couldn’t see how to make it work. That’s when the solution finally came to me! The material had to be ripped lengthwise to make individual strips out of each board. Clap board is beveled meaning it is thicker on one edge. If I was going to overlap it like a proper sunrise I needed to make it into separate pieces. Also, the 8 foot strips would need to be cut shorter to make a manageable size sunburst. I ended up with 46 pieces 24” long each. To make the rounded shape of the sun, I devised a jig that would allow me to taper each piece. With a little tweaking, I finally had the foundation for my project ready!
The radius in the center was a perfect fit for a one gallon paint can. I used the can as a template to make the center piece. Finally, I got rewarded with a glimpse of progress. Now I had something to work with, but the momentum stalled quickly. I realized I had no idea where I was going to put this beauty. It was absolutely huge! Our house was small and most of the wall “real estate” was spoken for. There was one more minor detail, I wasn’t sure how it was going to be finished. Should I paint or stain it? What colors should I use? Oh no!, not me selecting colors again! Being hopelessly color blind I began to sweat. I don’t even pick out my own clothes unless it’s Halloween. I decided I should float it out there on Facebook for some input. Epic fail! Note to self; never do that again. Once again the entire package was bundled and put off to the side for further review.
I had plenty of time to mull my next step over since then. I had been waiting quite some time to try out my new carving chisel set and now looked like the perfect opportunity. All I had to do was pick a face I could carve for the sun and choose some kind of material to use. I had heard mahogany carved well so I got some and began my carving activities. After several days this is what I came up with.
The picture below shows the carving sitting on top of the sunburst with a temporary bottom piece of wood.
Lots of work left to do!
I enlisted the help needed to choose finish colors from no one else but my wife Karen. This was a risky choice since we rarely agree on anything. What I mean is when it comes to selecting paint colors. She does have a good eye when it comes to decorating whereas I don’t so it was a good place to start. That’s not to say it wasn’t a challenging process for us. I was thinking Chalk paint for my first choice and she wanted it stained . The final selection for a finish was wood dye. I had to learn how to use it first though. Wood dye is different from wood stain. My goal was to apply the dye, allow it to penetrate in and leave the woods natural grain to remain visible. The challenges were two fold. First, the cedar material had over fifty years of dirt and oil on the surface. In order to allow the stain to penetrate I had to do something to the surface. I decided to hand plane each piece. Here’s what that looked like.Once they were planed, I painted the edges black to create a strong shadow line between pieces.The second challenge was going to be mixing the colors to achieve an array look. I decided to put this task off. I did know what color the sun carvings were going to be so I began staining them.It was time. There was nothing else left to do but get the dyes ready for the sky colors. I dove into mixing the dyes. My goal was to come up with three different shades of blue. It took some doing but I was finally ready to start staining my rays.The colors were good but I thought they would look better with another coating. I did have to tone things down a bit. The lightest blue in the center needed a little sanding. I massaged things a bit more and was pretty happy with the final product. Light has a big impact on how it will look and the picture below is a pretty good example of the interior of our home.
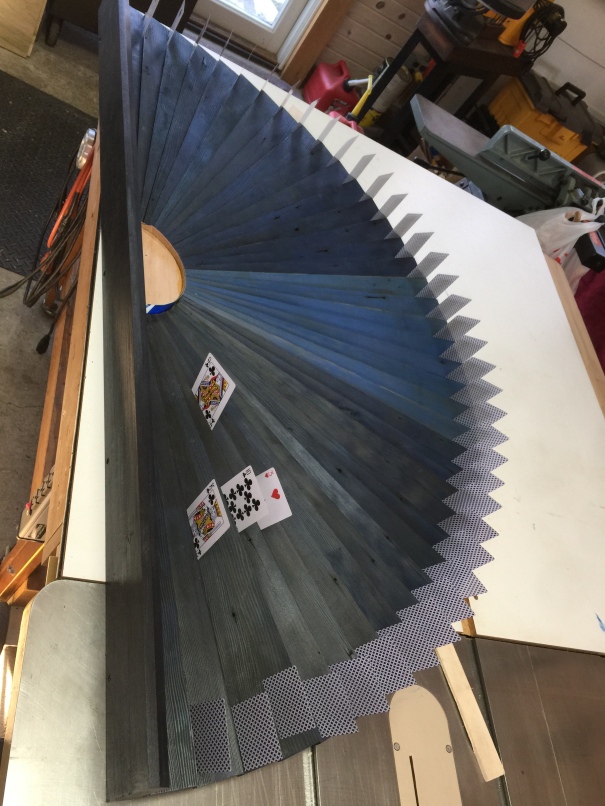
It was now time to permanently glue all the rays in place. Until now I was just placing the parts loosely together to get a good visual. The photo below shows what the glue up looked like. I used a deck of cards to make sure all the parts were evenly spaced. And it looked pretty cool to.
I still need to find a place for this behemoth. Turns out Karen wasn’t all that committed to the spot I had picked for its home. And since it’s so big, there really was only one spot it could fit and now that one might be off limits.
Maybe I’ll just put it out there on Facebook again! Thanks for reading my story about a shelf. Sometimes people even leave comments!
2 Years between blogs? What was I up to?


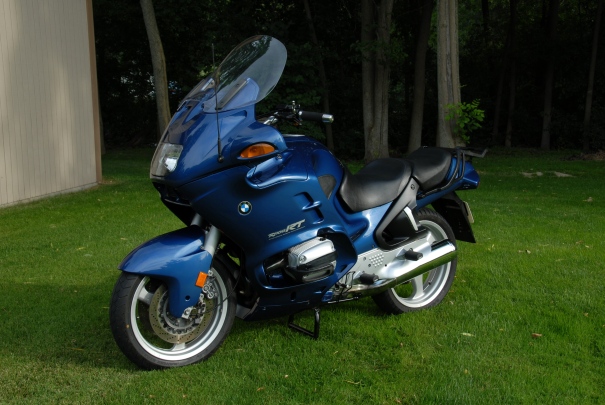
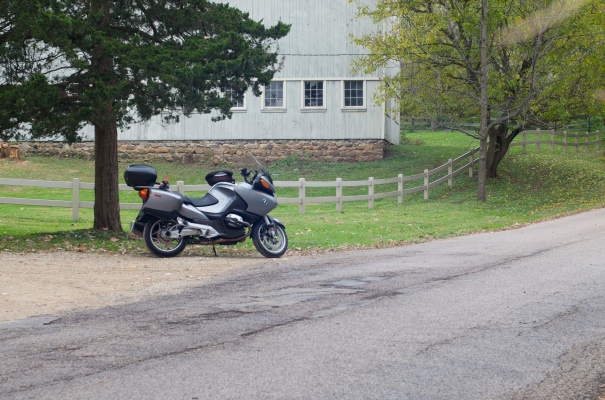
2006 next to a 1996 RT

At some point after years of thinking that BMW’s were awkward looking and under performing motorcycles along with something I would never own, I did a complete 180 and started looking for one to buy. This decision did not happen without lots of thought being involved. I’d been searching for a sport touring bike to replace my long lost Honda GoldWing I had enjoyed riding for years. I needed a new bike that could equal it on distance rides, but also had a decent level of sport riding bones. My sights were set on the Ducati ST4, a sexy twin cylinder liter powered Italian beauty, but was not really finding one I liked. And when I say liked, I really mean “could afford”. The next best choice in this class of motorcycles was Yamaha’s FJR 1300. This bike had been touted by many a journalist as the obvious answer to the question riders had been asking for years. Can I get a bike that does both sport and touring equally well? As luck would have it for me, a coworker had just bought one. One day we agreed to switch bikes at lunch time so I could get a feel for this mount. I was both ready and excited to like this Yamaha thinking my choice was finally about to be cemented. That was up until he proceeded to walk away from me in an impromptu throttle roll on race while riding my old 1988 GSXR 750. Geez, all that magazine hype about how the Yami pulls hard was gone in a matter of a few short seconds. Say it ain’t so! My old Suzuki was faster than a new 1300 cc fuel injected modern day sport tourer. I was both devastated and strangely satisfied simultaneously.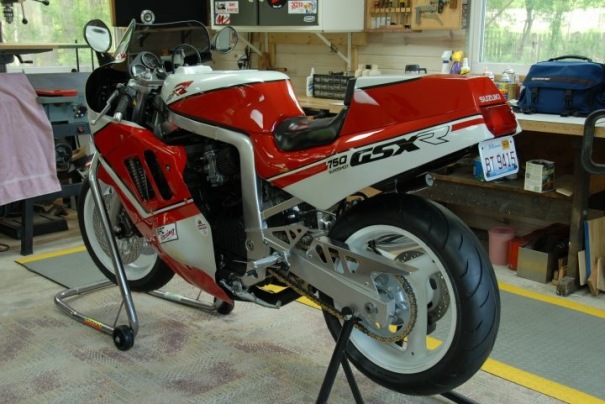
That last story leads me to how I made my next new choice for a ride. It was becoming clear there was no hyper speedy comfort touring motorcycle that had the inherent handling characteristics of a sport bike. I needed to rethink my whole scope of requirements. I just needed to give in a bit on my fixation with blistering acceleration and knife like cornering. I would have to find some sort of a compromise I could live with. Okay, I get it. All this might sound like I could be on the verge of showing some signs of maturity. Don’t buy it. I assure you when the time comes, there will be all forms of hedging my bets if I have any say in it. Maybe some high lift cams or a sweet set of flat slide carbs along with a nifty looking Italian carbon fiber exhaust canister. Not likely to happen but I can still dream. At this point, the only other contender left I would even still consider in this market was a BMW. Mainly because I like German made products and was pretty sure they were not “British Motor Works”. They had one I liked called the R1100RS which stands for Rally Sport. A nifty looking sport model with an incredible Ferrari Red paint job. All I had to do is find a lightly used and loved copy and I was in business. These bikes are more at home with a solo rider wearing flashy leather onsies, and while that sounds like a great time, I still thought my wife might want to go for an occasional ride. This sobering thought brought me to the next best option, the R1100RT. Rally Tour.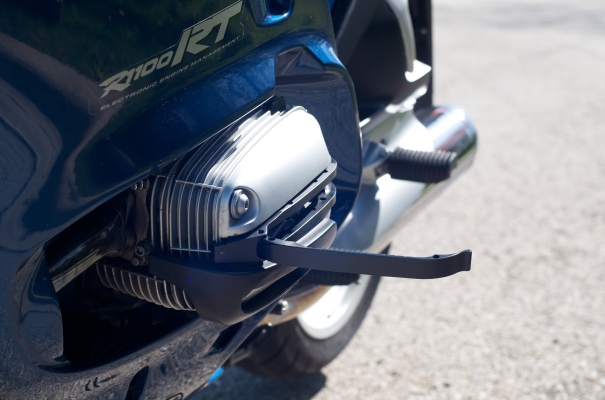
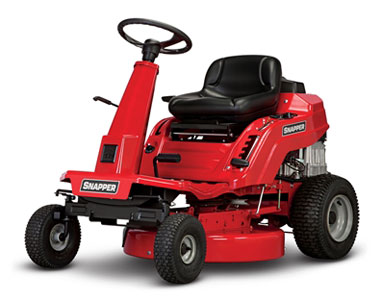
Here is where the story enters into it’s current chapter. I’m now officially hooked on my BMW’s. The ’96 R1100 I purchased a couple years back was a first generation oil cooled “Oil Head” machine. All engines made by BMW were previously “Air Heads” meaning they were air cooled engines. The engineers wanted to design a motorcycle that would take them to the next level and this was the one. They did a lot of things right but for me, it was the fact that I had a near 20 year old bike that still looked like new even compared to current examples. There were countless times when I was asked “is it new?”. I would always say new to me and then tell them it was a ’96 model. The reaction was always the same disbelieving look. I fell in love with the comfortable riding position and that low end torque of the liter plus twin. This machine could easily eat up miles. It was not fitting into the previously described category for a sport touring motorcycle but it was redefining a new experience for me. It was a machine designed to be ridden and the rider and machine would become one. Really, the only negative for me at this point was that a newer 1200cc version was already available. Unfortunately, this is the kind of thought that would continuously roll around my brain while I was burning up those “in between” miles on a road trip. So be it. The hunt had to begin, and this is where I confess to being an on-line shopping junkie. I’ll search for my next bike using nothing but a computer and the internet. I personally have purchased an incredible range of items on the computer over the years. I t really is amazing how I can sit in my house sipping coffee and purchase anything I can think of. Anywhere. Any time. My favorite example would be the mower I bought sight unseen from North Carolina dealer and had it drop shipped to my house. I am now referred to as Forest Gump when I cut the lawn.
I set my sights on the ten year old range and had a certain price limit to stay within. One advantage to buying a motorcycle this way are all the aftermarket add on goodies that come with them at a near 100% discount. Guys love to accessorize their rides. A new seat or a custom exhaust system can easily run over a thousand dollars each. See second picture below. That is a carbon fiber Slip on costing the previous owner over a thousand and me, nothing. Next detail to look for is how many miles are on the bike. You can tell a lot about the owners riding habits from the miles compared to how long he has had it. My theory is that the majority of miles on the first year. Then the excitement level starts to go down along with the miles until one season he realizes its no longer being used and its time to sell. I look for this type of seller because the bike will have low miles and he will have a lower emotional attachment. I stay away from the long winded sales pitches and the ones touting how rare or great their motorcycle is. Too hard to get a deal from them. When I see something I think I can work with I enter in with something that never gets old, Cash.
 I found this Rt on EBay offered by a seller in Northeastern Indiana. It is a 2006 R1200ST which stands for “Special Tour”. It came stock with a host of options costing extra on the RT including stainless steel brake line, ESA, and cruise control. I made two offers and he accepted the second one. Purchased sight unseen based on all the facts I had. After I got it, I picked up a BMW tank bag on EBay for 70 bucks along with a top box for around 2 hundred. She was ready to ride.
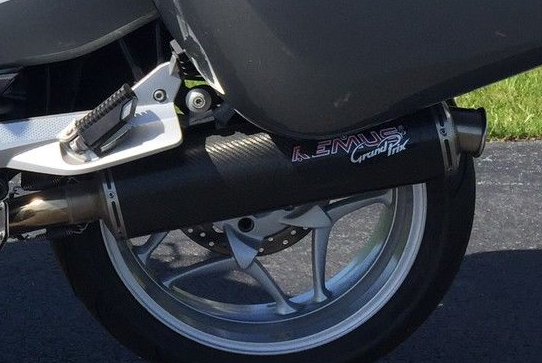
Karen has never wanted to ride on this motorcycle due to the lower comfort level compared to the GoldWing. However, I have a new riding partner, Nora who is always willing to take off with me on an adventure. we have shared a few good rides so far and hope to do more.

Time has come for me to return to my much neglected wood working projects. Who knows maybe a blog about something I make in the shop next is in order. At any rate , I want to thank you for taking the time to read this one even if motorbikes aren’t your cup of tea. Thanks, John
Project Tooltray almost completed .

This picture shows the top level of the Tooltray. I get more work space if I choose not to have storage in the tray below. The finger holes allow easy removal of the individual inserts.

<<a href="https://shinnjj.files.wordpress.com/2015/02/ Continue reading “Project Tooltray almost completed .”
Slowly Marching Forward on the Work Bench Saga
OK so I knew there would be long dry spells in between my project updates. Just like the real world I guess. I have been very busy hanging around the fringed edge of working on my new Tool Tray. By that I mean I’ve been fooling around with other things sort of related. The truth is when I purchased the work bench, I stepped into a kind of man tool fantasy camp and acquired a boatload of renovation project tools. I really enjoy doing a tool makeover especially with the older ones and I had plenty to material to preoccupy my time with. I am a toolmaker by trade which has nothing to do with the tools I use for woodworking but there must be a connection.
Here’s a picture of one of the tools from the pile It’s an older hand plane I restored for everyday use. Both the handles were replaced with new ones made by me out of an exotic wood named Wenge. Not bad I think for my first foray into the sub culture of old hand planes.

Getting back to my workbench story, this guy had everything tool related ever imagined and I was right there with cash I might add. He was showing me tools at rate so fast my mind was numb. No kidding, I would mention some type of hand tool and he would produce a laundry basket filled with them. The next thing I knew there was this crazy huge pile on top of the soon to be mine bench. At one point he pulled out an actual antique Anvil. Who doesn’t need one I thought for a moment then snapped back to reality. I’d seen most of this genre tools on eBay and they don’t go cheap. Well, it was time to start paring down the booty and begin negotiating. If anyone has seen the show American pickers, you have some sort of sense for my new-found bargaining skills. Problem is, my Tool Barker guy has seen the show too. I was already a little higher on the price for the bench than I wanted to be but still at a good price for me. I was lower than his asking price which only meant I had more cash to spend and we both knew it. I then selected what I thought were the gems from the pile and took out the ones he ranked as desirable (expensive). once I made my choices, we began the dance. I can’t use actual numbers volleyed around for fear of incriminating myself, but I would compare it to a well choreographed tango and I’m still not sure who was leading. I laughed about it in the truck all the way home from Chicago. The deal ended just like the Pickers show does with my new friend coming out to shake my hand and admit he had enjoyed himself. I can still see him waving to me in my rear view mirror as I drove off with a heavy load.

I do have a lot of progress making my tool tray but I do not have enough time to present it properly. I am going to close out this post with a couple of photos showing work that has been completed. Today was a “glue-up” day wich means there will be waiting as the glue cures. That’s good because I need a break and tomorrow is back to work.


&rnbsp;More progress last night. Finished the middle support for the trays. Had to get creative with the joinery in order to allow for assembly. The support block has tenons that will fit the mortises cut into the long rail. Opposite side das a simple rabbet to fit inside rail. The two ends are finished and the whole assembly is ready for glue-up. Note there are no fasteners used. Firstly, you don’t want any metal in or on the work surface that could cause damage. To the fine edges of the tools. Secondly, it shows the craftsmanship of the maker in relation to his joinery skills.


Hundred Year Old Distraction
 At nearly 20 inches long,, this old Bailey No. 8 is a beast to use. Marked with a Patent date of Mach 1914 she is nearly one hundred years old.. II bought this plane very inexpensively from a 2nd hand shop on the Fourth of July, 2014. I put her back into service after a few hours of massaging the hardware. I love finding old tools and giving the new life. The good ones will be useful forever! Continue reading “Hundred Year Old Distraction”
Threefish Workshop is my means to an end project

Starting out now with my new blog about working with wood, words can fall short of describing the details of the journey leading to the present configuration. The entire path can be measured out to about sixteen years time (and counting). I am going to show how my current projects and previous ones work together towards a goal which, unfortunately, is always changing. There will be times during my blogging where I might find myself getting off topic and mixing in some personal humor. That being said, I am going to leap feet first into the current project.
Making this Antique Work Bench Work for Me.
This is how she looked the day I brought her home.

Here’s a shot of the major components that make up the top work surface and two vises.

Tonight, I am starting the joinery layout for the new tool trough. The design will allow me to lift out a two-piece bottom made from half-inch birch plywood to clean it out. The new framework will both stiffen the bench and support the updated drop in top pieces. When any top piece is removed along with a bottom tool tray, there will be access for clamping to the tabletop. I will finish this blog by adding a pic of my current bench. She has served me well for a quarter century its configuration has been massaged numerous times, more than I can count. I may keep it around for the occasional hammering episodes.
 This bench pictured above has a slide out power tool tray and a machinist vise mounted to a quick change aluminum plate. The beer is shown for perspective .Stay tuned in for my next installment featuring the finished product. Hopefully work/ life events will not interfere with me finishing things.
Below is the bench top turned upside down to allow for some measurements. The gaping hole is where the new tool tray is going to be installed.

